In this post we will see the SNMP configuration on WLC to add to WCS/NCS or Prime INfrastructure.
Simple Network Management Protocol (SNMP) is an application layer protocol that provides a message format for communication between SNMP managers and agents using UDP ports 161 and 162 for sending and receiving SNMP traps.
Configuration SNMP on cisco WLC via GUI & CLI.
First login to WLC (After configuration via CLI or GUI) then go to Management > Summary Tab: This shows the summary of management section.
General Tab:
As we are aware that to connect with WCS/NCS/PI, we must enable SNMP v2c / SNMP v3 mode and can fill/change other information like: Name, Location and Contact person.
We can also modify this information via CLI by using these commands:
(WLC1) >config snmp  syscontact Mr. Sandeep
(WLC1) >config snmp  syslocation MyTestLAB
(WLC1) >config snmp  version v1 ?
 enable         Enable SNMP version.
 disable        Disable SNMP version.
(WLC1) >config snmp  version v1 disable
(WLC1) >config snmp  version v2c ?
 enable         Enable SNMP version.
 disable        Disable SNMP version.
(WLC1) >config snmp  version v2c enable
(WLC1) >config snmp  version v3 ?
 enable         Enable SNMP version.
 disable        Disable SNMP version.
(WLC1) >config snmp  version v3 enable
Now let’s start with SNMP communities section.
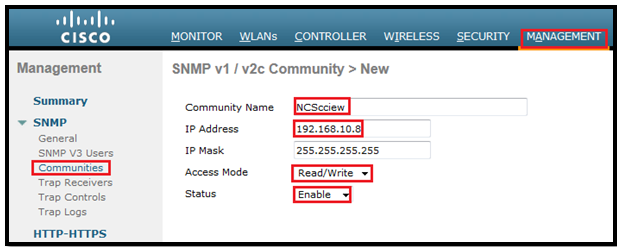
In Management > SNMP > Communities Section:
Before creating a new SNMP community, we must delete old “Private” SNMP community due to security issues.
Now we will create a SNMP community and other information.
We must enter the NCS IP address (if some other IP then make sure that our NCS server must come in the range of IP we configured). Access mode can be Read only or Read/Write.
Here is the way to create SNMP community via GUI:
Via CLI:
(WLC1) >config snmp community create NCScciew
(WLC1) >config snmp community ?
 accessmode     Configure the access mode (read-only or read-write) for a SNMP community.
 create         Add a new SNMP community.
 delete         Delete a SNMP community.
 ipaddr         Configure the IP address and mask to be accessible for a SNMP community.
 mode           Enable or disable a SNMP community.
(WLC1) >config snmp community ipaddr 192.168.10.8 255.255.255.255 NCScciew
(WLC1) >config snmp community mode enable NCScciew
(WLC1) >config snmp community accessmode rw NCScciew
Now we will the configuration for SNMP v3 user(Most secured way):
From a security point of view, it is recommended to run SNMPv3 with the default username changed or disabled or deleted. Keep in mind that our SNMP settings must match between the controller and the wireless/network control system (WCS/NCS). Also, we should use an encryption and hash keys that match our security policies.
Via GUI:
It’s the same procedure as we did for SNMP v2c. We need to enter a user profile name, Access mode, which type of authentication & privacy protocol and last one is auth & priv password. (I used cisco123456789 as auth and priv password)
Via CLI:
***Make sure that we must delete the default snmp v3 user profile due to security reasons.
How to delete it.
(WLC1) > config snmp v3user delete default
(WLC1) > config snmp v3user create rscciewWLC ro hmacsha aescfb128 cisco123456789
In the same section under Management > SNMP, we can also configure SNMP Trap receiver/Trap control/Trap logs.
Via GUI:
Via CLI:
(WLC1) > config snmp trapreceiver create NCS 192.168.10.8
(WLC1) > config snmp trapreceiver mode enable
We can control which SNMP traps we want to send to this trap receiver via Trap Control section under SNMP.
Now we will try to add our controller to WCS/NCS via SNMP v2c mode and SNMP v3 user.
Login to WCS/NCS and then go to Configure > Controller and then from right side drop down box select Add Controllers:
And then click on Go. This window will appear:
We must enter WLC ip address and community name which we created in WLC “NCScciew”
1st we will try to add WLC to NCS via SNMP v2c community:
Here is the screenshot from NCS:
Now we will remove again and try to add with SNMPv3 user name.
Screenshot from NCS after WLC successfully added:
That’s all about SNMP configuration.


